


Week 3 Task - Modular Hexagon Frame
 Instruction


Information
      When it comes to gift giving, do you ever struggle to figure out what to give. Especially for those who have everything, or for the minimalist....but that does not mean they will not appreciate receiving gifts.

But that issue inspire me to put together this modular unit, which is expandable, it is easy to add an additional unit to it in the future and build on it, and also it is rearrangeable, so all the modules can be moved around to get a different configuration.

So it is a gift that can be kept on giving, and since it is always going to be one unit, so it will feel less cluttering.
Instruction
Step1
IDEA:
After I came up with the modular idea, I figure a Hexagon shape will work best for what I had in mind, so, as usual, I started with some sketches on my iPad with Procreate.
With straight sides of the hexagon, they can easily be butt up to each other.
But to have the expanding and rearranging ability, I figured that some kind of joint with the idea of the "Mortise and Tenon" idea might work.
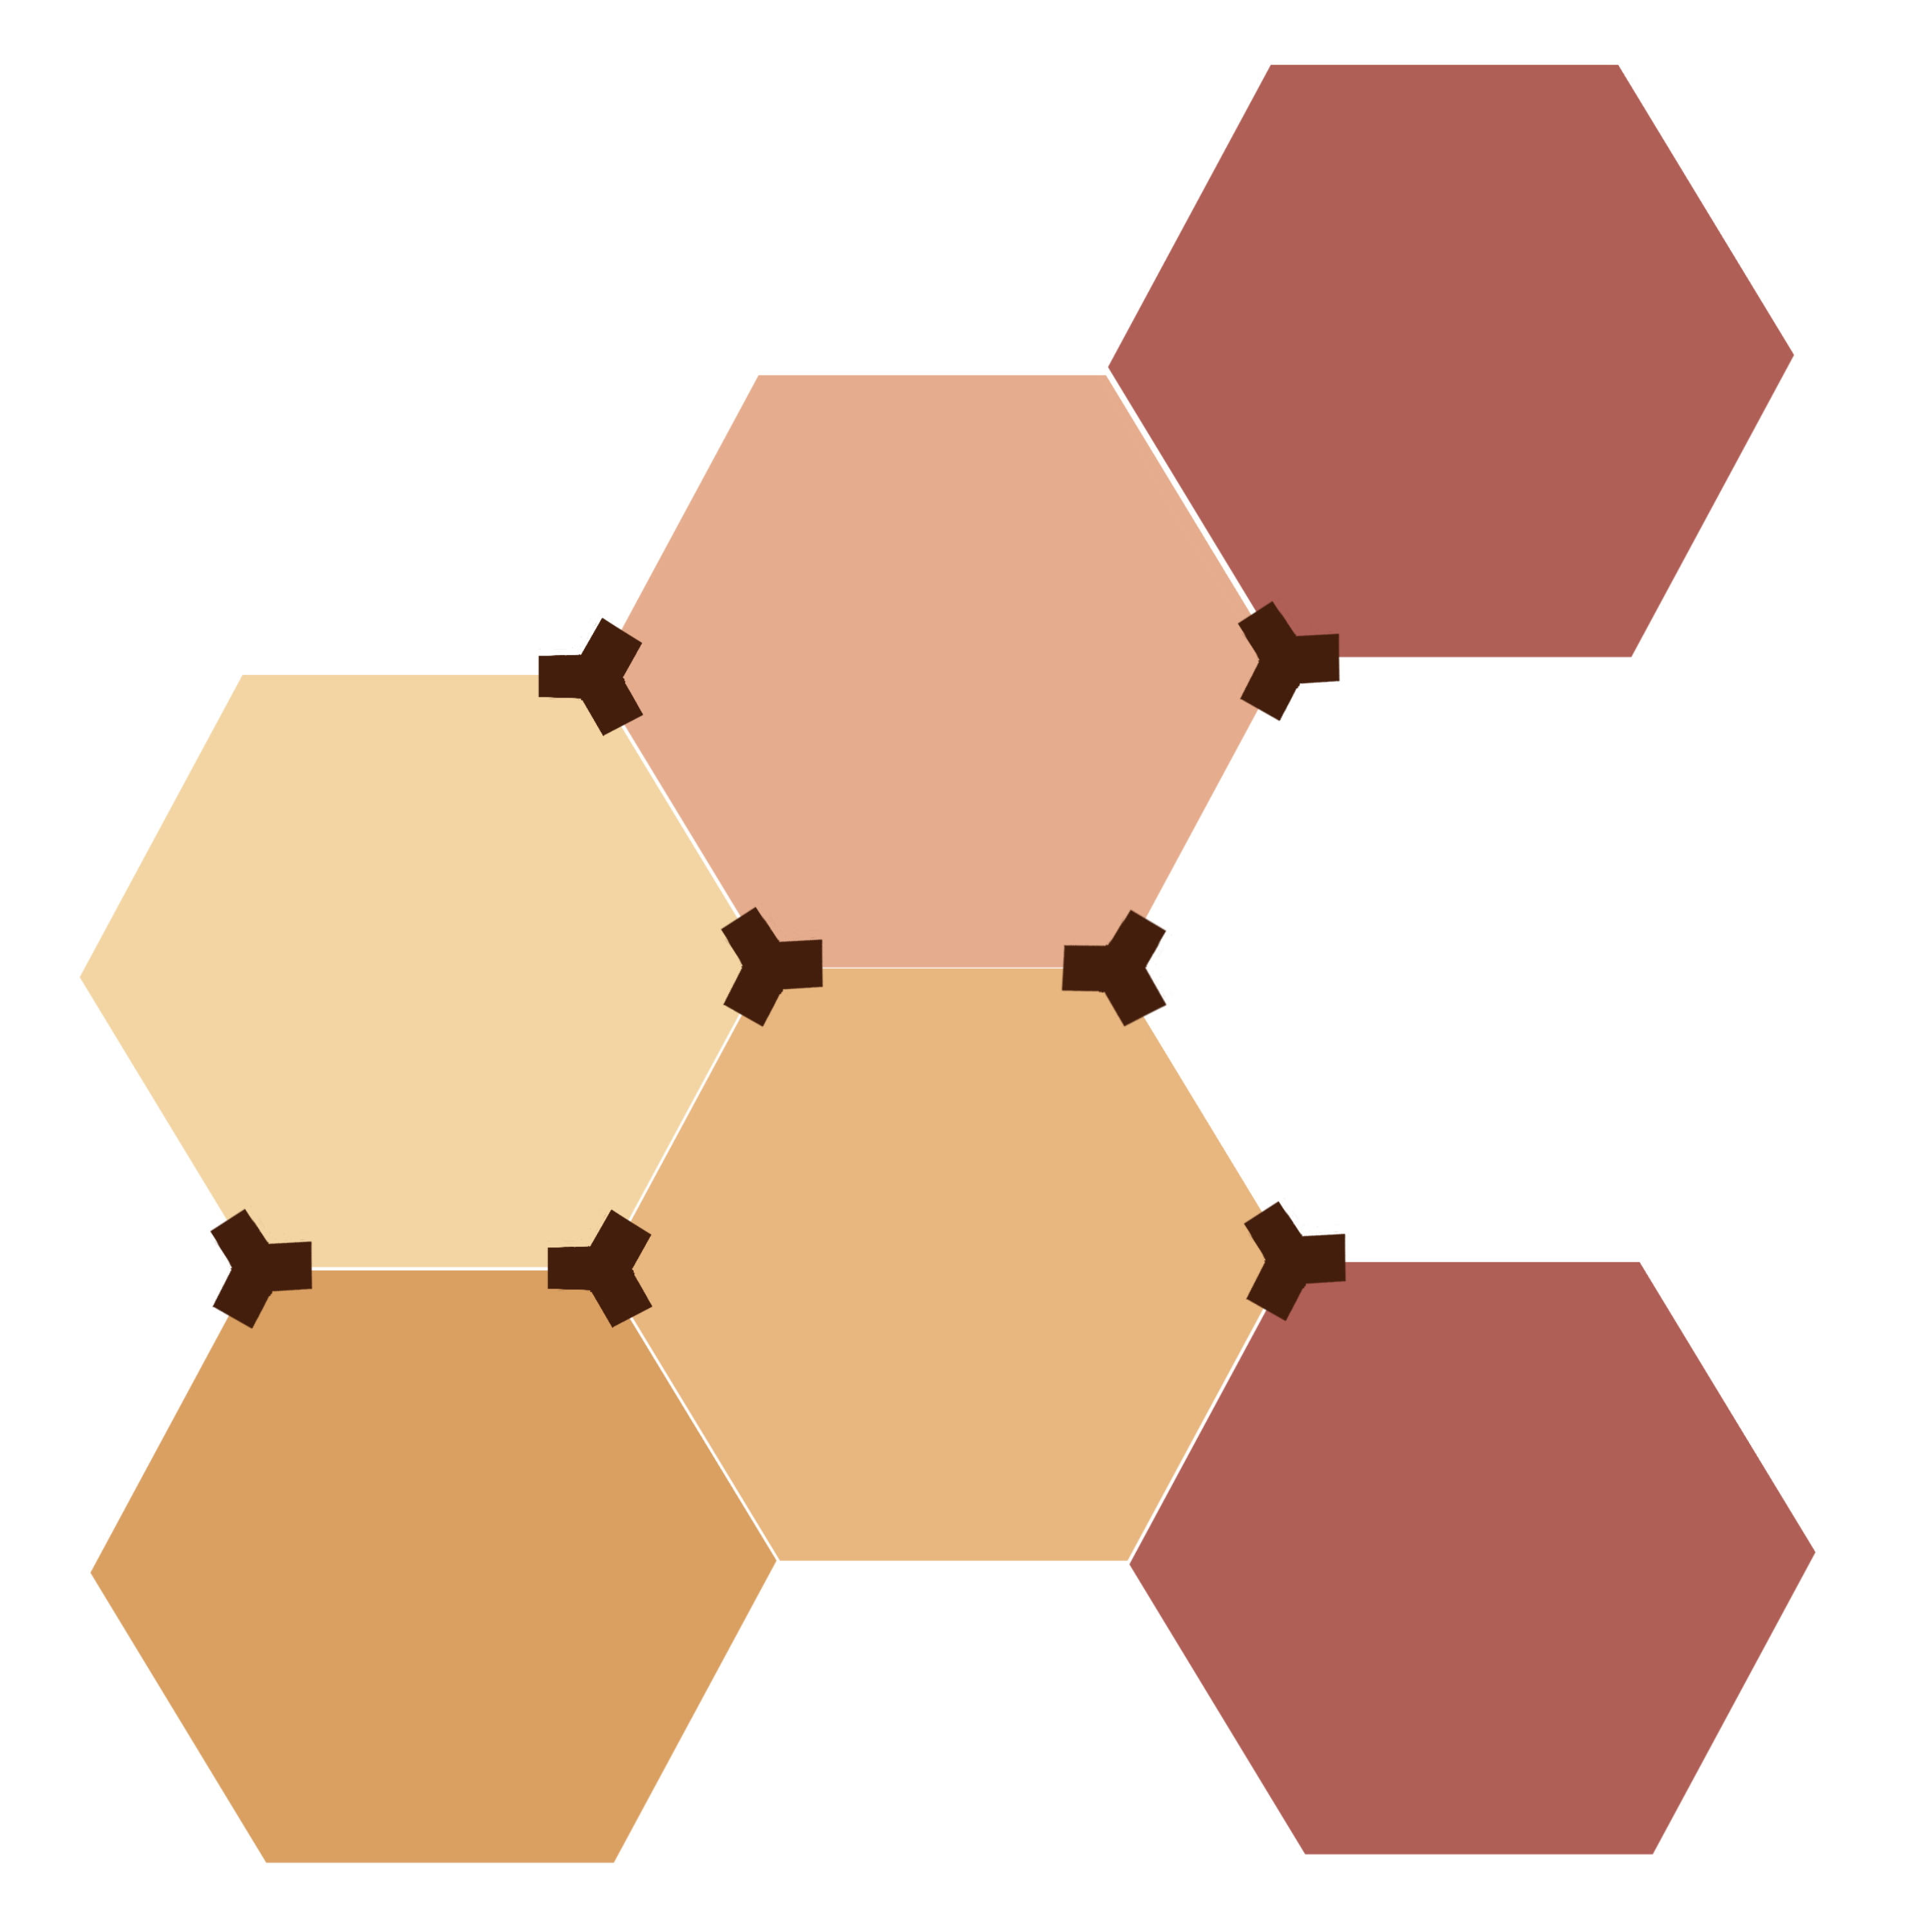 From the sketch, it is easy to see, the hexagon, of course, is the main geometry. To keep it simple, 3 layers will be the minimum, with the middle layer slightly smaller, which will create a grove for inserting the joint.
And now, it is time to put my ideas to the test.
Step2
Basic Module 1:
I drew 3 Hexagon, exactly the same size
Layer 1: An internal offset of 0.25" of the first hexagon, then "Subtract" the small hexagon from the large one, and create a Hexagon Ring.
 Layer 2: An internal offset of 0.1" for the second hexagon, delete the original one, this will be the Basic Layer 2, when sandwiching it between Layer 1 and Layer 3, it shall create a 0.1" groove all around. This layer can be solid or a doughnut shape, it all depends on what you are going to make.

Option 2 of Layer 2:
Take Basic Layer 2, and do an internal offset of 0.15", "Subtract" the new geometry from Basic Layer 2, and you will get a doughnut shape hexagon.

** Two options for Layer 2 **

Layer 3: As is, the solid hexagon will be the backing layer.
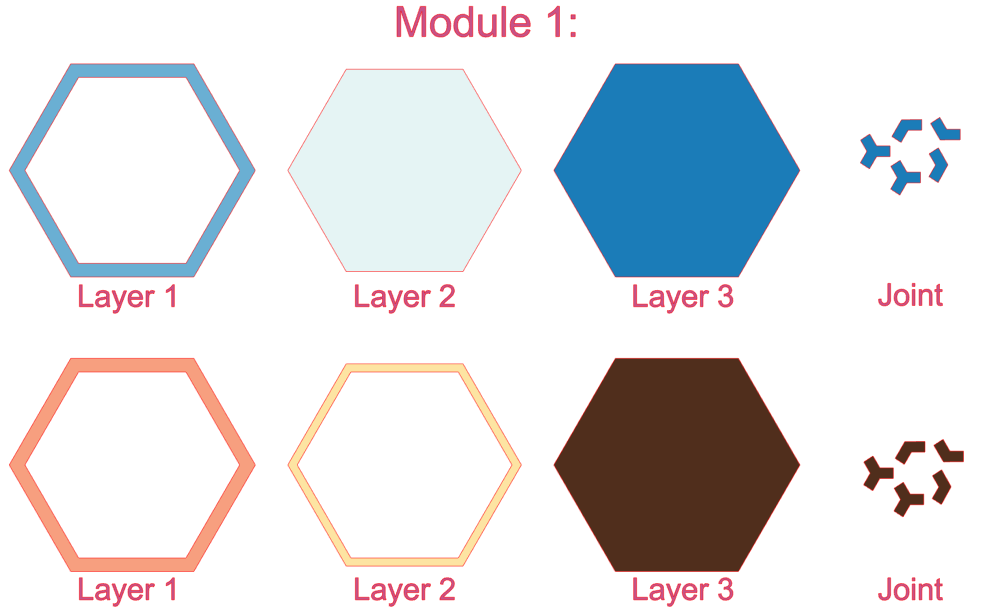 These are the 3 basic layers of Module 1.
So any cut or cut-out designs can be created on Layer 1 and Layer 2. And Layer 3 will be just the backing, any engraving or scoring can be created on this layer.
Step3
Basic Module 2:
With Option 2 of Basic Module 1 Layer 2, delete two sides, you will leave with a "U" shape


Put all three layers together, and it will still create a 0.1" groove for the "Joint", but the "U" shape of Layer 2 will create a slot, so become an insertable picture frame.
 This will be Module 2, which is a picture frame.

Step4
Joint

- Butt 3 sets of Layer 1 and Layer 2 together, as you are putting them together in real life
- Weld all 3 Layer 1 together
- "Subtract" all 3 of Layer 2 from Layer 1
- Cut off the extra material to create the 3-leg joint
- I also create some 2-leg Joints for use around the border.

Step5
Adding the designs to the Basic Module:
Example 1: Neighborhood Map
I create 4 separate neighborhood maps, which are water, land 1(golf courses), land 2, and road

Since I only have two layers to put the design on, I decide to put the road on Layer 2 and do a cutout. The rest of the maps on Layer 3, by using the score, and different strengths of engraving to differentiate them from each other.
 *For detailed instructions on how to create the map, please refer to my Laser Cut Map How-to"
Step6
Example 2: Tribute to Father
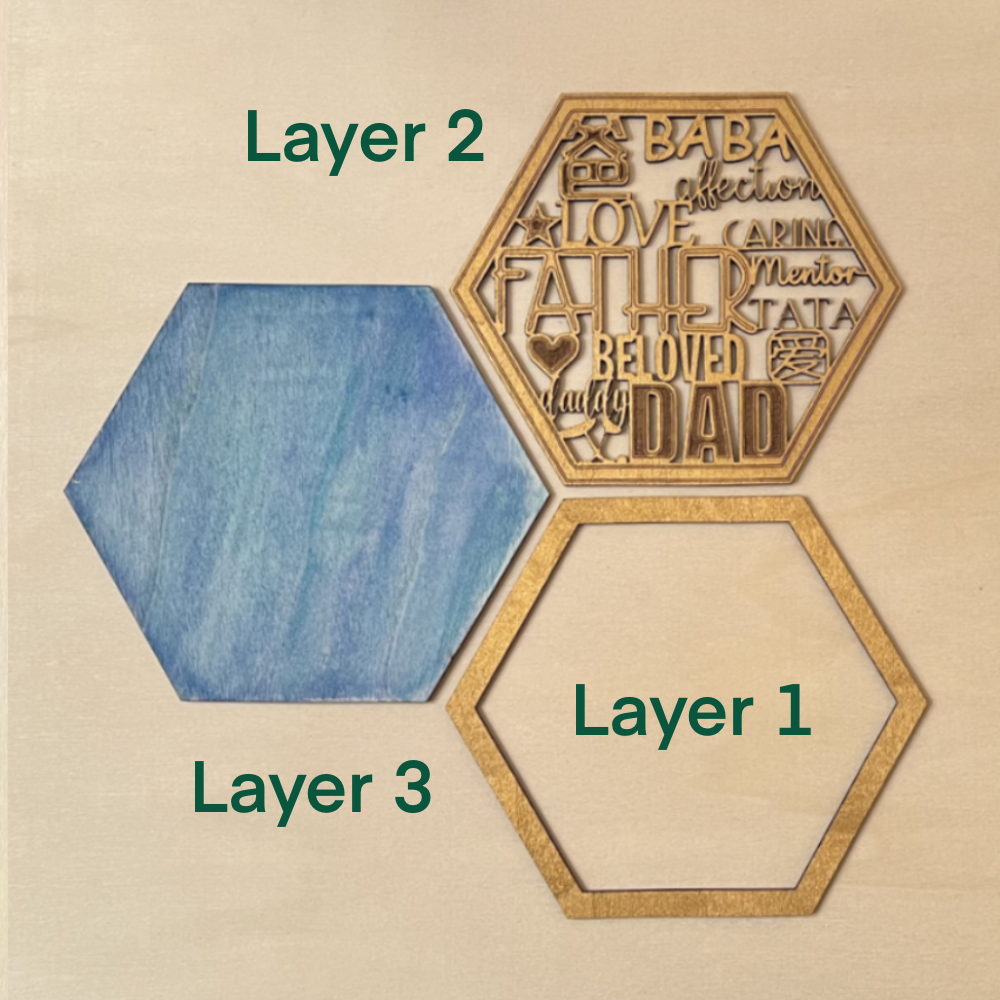
For Father's Day, I wanted to create something to pay tribute to all fathers, I found a few different languages for father or dad, and add some words to describe the quality of the father, by playing with different fonts, and the layout, I put the design on Layer 2, and this what I end up with:

Of course, you can always personalize it. Or add some extra scoring line or engraving to create some depth.
 Now save everything to SVG format, and ready for laser cutting.
Step7
Laser Cutting:
Thanks to the new XCS software update (V1.3.21), the "color of layer" and "setting saving" features, the files your download here should have the right color and my setting. But of course, you can always experiment your own setting.
**For engraving: I use "Red" for water (100/80/1, 140line per cm) and
"Green" for golf courses (50/80/1 140line per cm), in order to get different depth.
**For Scoring: I use "Orange" for the Land 1, and a gluing guideline mark on Layer 3 (40/20/1)
**For Cutting: I use "Purple" (100/4/1 for 1.5mm Basswood)
For "Map":
Layer 3:
- Score (40/20/1) orange outline of Land 2 and gluing guideline
- Engrave Land1 which is the golf courses
- Engrave Water
- Cut with the outline
Layer 2 & Layer 1:
Just simple cut
For "Tribute to Father":
Opt 1: Just straightforward cut for all 3 layers
Opt 2: Layer 2: Engrave (Red) first, then score (Orange), then cut (Purple) the outline.
 For "Joint":
Go ahead and cut a whole bunch of them, this is where you can use up all the scrape area.
For "Basic Module 2":
Go ahead and cut all layers on the gold board, but cut the "Image Placing Board" with thinner wood, chipboard, or heavy cardstock.
Step8
Coloring:
For some layers, maybe it will be a good idea to color them before the cutting.
So, I went ahead and paint one board with my base color gold, where I cut all my Layer 1.
For the "Map", I did Layer 3 on the gold board, but I found that the engraved area for the golf courses and the water looks kind of bear, so I lightly stained the golf courses with yellowish green paint, and color the water light blue, I also top the water with some Diamond Glaze (https://www.amazon.com/dp/B001B26II4?ref_=cm_sw_r_cp_ud_dp_2AGKM3P4M6PP51YBVPDF) which make them looks like water.


For the "Tribute to Father", I cut Layer 1 and Layer 2 on gold board, but for Layer 3, I try one with black, and one with blue to offer a contrast.
For the Module 2, I went ahead print one of my watercolor painting as the photo.
Step9
Assembly:
First, always do a dry fit and make sure everything looks fine, pay attention to the orientation of the Hexagon. The gluing is fairly straightfoward.
Here are the 3 examples and bunch of joints

You can put together with either 3-leg Joint or 2-leg Joint, 
You can take them apart, change them around to get different configuration.

And from now on, you can add a birthday one, an empty frame, so they can add their one photo, chalkboard paint on one, or simply just a plain one, the option is endless.....
Remixes


You may also like

Acrylic photo on wood Valentines Day frame


Week 1 Task - 5x7 ABC Picture Frame

Glass engraving in picture frame

Mejor Papá / Mejor Mamá

"Best Mom" Mother's Day Photo Frame.


Valentine’s Day Heart Frames

6x4 Mama Bear Picture Frame


Pokemon card picture frame gift


"Bloom Where You Are Planted" Frame

Circle Frame SVG | Circle SVG | Round Frame SVG


Embroidery & wooden frame for newborn baby (girl) - Broderie et cadre en bois pour bébé (fille) venant de naitre


Victorian "Frame"

Puzzle photo frame stand


Wooden Photo Frame

Rectangle Frame SVG | Rectangle SVG | Rectangle Frame SVG

Mothers Day Polaroid

Photo Frame


School Days picture frame